
In an era where visual content dominates e-commerce, social media, and branding, high-quality product photography is no longer optional—it’s essential. Whether you’re an entrepreneur launching your first online store, a content creator building a personal brand, or a small business owner trying to compete with big retailers, the way your product looks in photos can make or break your success.
The good news? You don’t need expensive studio equipment, complex lighting rigs, or a professional photography background to create stunning product images. With a simple window, a bit of creativity, and an understanding of light, you can achieve professional-level results.
This guide will walk you through everything you need to know about using window light—one of the most powerful and accessible tools in photography—to capture beautiful, clean, and compelling product images.
🌞 Why Window Light Works So Well
Window light is a form of natural light, and it has several advantages over artificial lighting:
✅ Benefits of Window Light
| Benefit | Explanation |
|---|---|
| Soft and flattering | Natural light diffuses easily, reducing harsh shadows |
| Free | No need to invest in lighting gear |
| Easy to control | Can be shaped with simple tools like curtains or paper |
| Realistic colors | Produces accurate color rendering |
| Beginner-friendly | No technical setup required |
Unlike direct sunlight, which can be harsh and create strong shadows, window light is typically indirect, making it ideal for product photography.
🧠 Understanding Light Basics
Before you start shooting, it’s important to understand a few fundamental concepts.
1. Direction of Light ➡️
Light direction affects how your product looks:
| Direction | Effect |
|---|---|
| Front lighting | Flat, minimal shadows |
| Side lighting | Adds depth and texture |
| Backlighting | Creates glow and drama |
👉 Pro Tip: Side lighting is often best for product photography because it enhances texture and dimension.
2. Quality of Light 🌫️
Light can be:
- Soft: Diffused, gentle shadows (ideal)
- Hard: Sharp shadows, high contrast
Window light becomes soft when filtered through:
- Curtains
- Frosted glass
- Clouds ☁️
3. Color Temperature 🌡️
Natural light changes throughout the day:
| Time of Day | Light Color |
|---|---|
| Morning | Cool, bluish |
| Midday | Neutral |
| Golden hour | Warm, orange |
👉 Consistency is key—try to shoot at the same time each day.
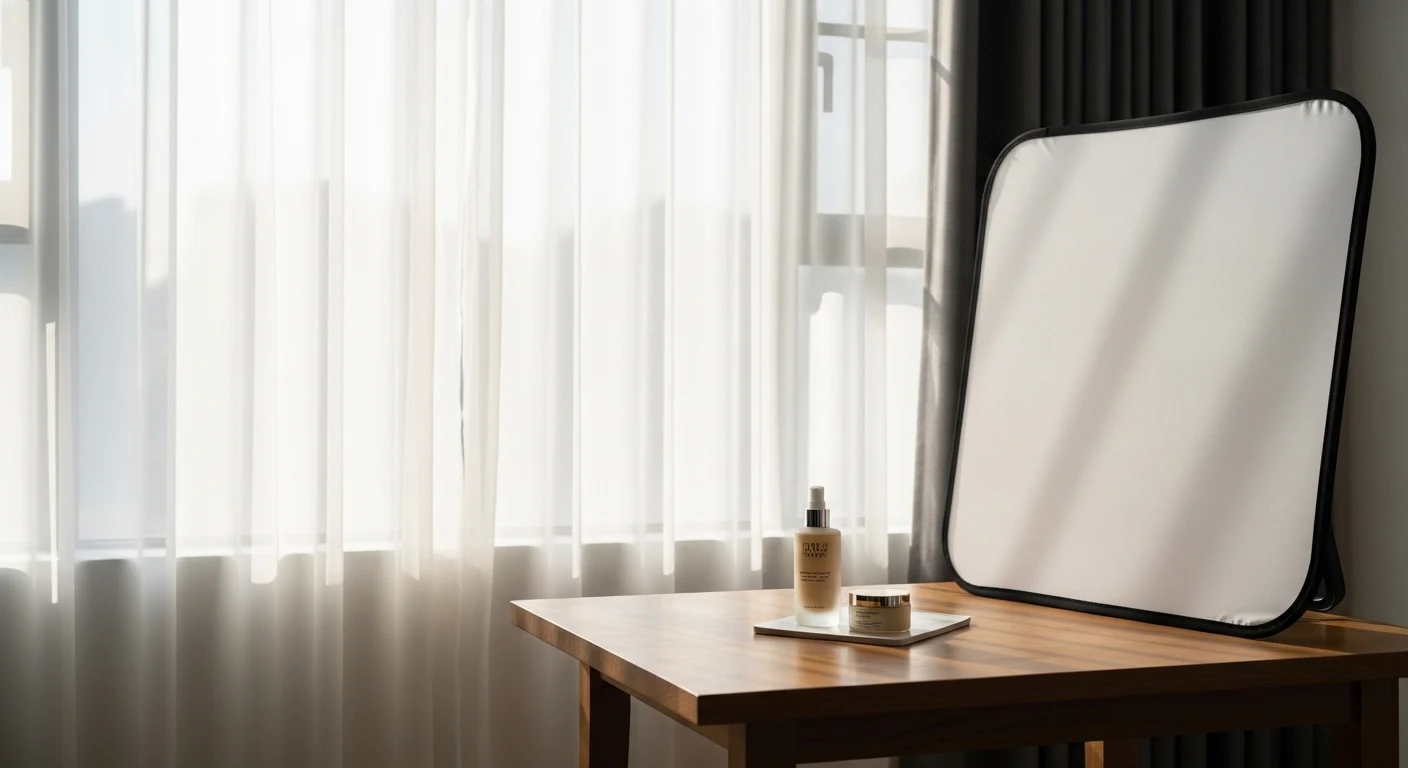
🪟 Setting Up Your Window Light Studio
You don’t need a full studio—just a thoughtful setup.
🧰 Basic Setup Components
| Item | Purpose |
|---|---|
| Window | Main light source |
| Table | Shooting surface |
| Background | Clean visual context |
| Reflector | Bounce light back |
| Diffuser | Soften harsh light |
📍 Positioning Your Setup
Option 1: Side Lighting (Recommended)
Window → Product → Camera
- Creates depth
- Highlights texture
- Most versatile
Option 2: Front Lighting
Window → Camera → Product
- Even lighting
- Less dramatic
- Good for catalogs
Option 3: Backlighting
Camera → Product → Window
- Creates glow
- Needs reflector to fill shadows
🎨 Choosing the Right Background
Your background sets the tone for your product.
Popular Background Options
| Background | Style |
|---|---|
| White | Clean, minimal |
| Black | Dramatic |
| Wood | Rustic |
| Fabric | Soft, lifestyle |
| Colored paper | Creative |
👉 Keep it simple—your product should be the star ⭐
🪞 Using Reflectors and Diffusers
Reflectors 🔁
Reflect light back onto your product.
DIY Reflectors:
- White paper
- Foam board
- Aluminum foil
Diffusers 🌫️
Soften incoming light.
DIY Diffusers:
- Sheer curtain
- Baking paper
- White cloth
📷 Camera Settings for Best Results
You can use a DSLR, mirrorless camera, or even a smartphone.
📸 Basic Camera Settings
| Setting | Recommendation |
|---|---|
| ISO | 100–200 (low noise) |
| Aperture | f/4 – f/11 |
| Shutter Speed | Adjust for exposure |
| White Balance | Daylight |
📱 Smartphone Tips
- Use grid lines
- Tap to focus
- Lower exposure manually
- Use HDR carefully
🧩 Composition Techniques
Great lighting is only part of the equation.
📐 Rule of Thirds
Divide your frame into a 3×3 grid.
- Place product off-center for interest
🔺 Leading Lines
Guide the viewer’s eye toward the product.
⚖️ Balance
Use props carefully—don’t overcrowd.
🧴 Styling Your Product
Styling adds personality and context.
✨ Styling Tips
- Use props that complement the product
- Stick to a color palette 🎨
- Keep it clean and intentional
Example Styling Table
| Product Type | Styling Ideas |
|---|---|
| Skincare | Towels, plants, water droplets |
| Food | Ingredients, utensils |
| Jewelry | Fabric, stones |
| Tech | Minimal desk setup |
🌤️ Best Times to Shoot
Timing matters more than you think.
⏰ Ideal Shooting Times
| Time | Quality |
|---|---|
| Early morning | Soft, cool |
| Late afternoon | Warm, golden |
| Midday | Bright but harsh |
👉 Avoid direct sunlight unless diffused.
🛠️ Common Mistakes to Avoid
❌ Mistakes
- Shooting in direct sunlight ☀️
- Using cluttered backgrounds
- Ignoring shadows
- Over-editing images
- Inconsistent lighting
🖼️ Editing Your Photos
Editing enhances your image—but should not overpower it.
🧑💻 Basic Editing Adjustments
| Adjustment | Purpose |
|---|---|
| Exposure | Brightness |
| Contrast | Depth |
| White balance | Color accuracy |
| Sharpness | Clarity |
Popular Tools
- Lightroom
- Snapseed
- Photoshop
🧪 Step-by-Step Workflow
📋 Workflow Checklist
- Choose your window
- Set up table and background
- Position product
- Add reflector/diffuser
- Adjust camera settings
- Take test shots
- Refine composition
- Shoot multiple angles
- Edit photos
📦 Shooting Different Product Types
🍔 Food Photography
- Shoot quickly (food changes)
- Use side lighting
- Add texture
💎 Jewelry
- Use diffused light
- Avoid reflections
- Use macro mode
👕 Clothing
- Use mannequins or models
- Keep wrinkles out
- Shoot multiple angles
🔄 Creating Consistency
Consistency builds brand identity.
🎯 Tips
- Use same background
- Same lighting direction
- Same editing style
📊 Sample Lighting Setup Table
| Setup | Light Direction | Tools | Result |
|---|---|---|---|
| Basic | Side | Window only | Soft shadows |
| Advanced | Side + reflector | Foam board | Balanced light |
| Diffused | Front + curtain | Curtain | Even light |
💡 Advanced Techniques
🌈 Using Shadows Creatively
- Add drama
- Create patterns
🔍 Macro Photography
- Capture details
- Use tripod
🎭 Mood Creation
- Dark background + side light = dramatic
- Bright background + front light = clean
🧭 Final Thoughts
Mastering window light is one of the most valuable skills in product photography. It teaches you to see light, understand it, and shape it without relying on expensive tools.
With practice, patience, and creativity, you can create images that not only look professional—but also tell a story, evoke emotion, and drive sales.
Leave a Reply