Natural lighting is the most powerful, accessible, and underestimated tool for creating stunning videos with your phone. While many creators obsess over camera specs, resolution, frame rates, and expensive gear, professionals know a deeper truth: light is everything. Even the most advanced camera cannot compensate for poor lighting, and even a modest smartphone can produce cinematic results when natural light is used correctly.
This comprehensive guide will reveal the secrets of natural lighting — not just the basics, but the deeper principles, techniques, psychology, physics, and practical setups that transform ordinary phone footage into professional-looking video.
Whether you’re creating content for social media, YouTube, online courses, interviews, personal branding, or storytelling, mastering natural light can dramatically elevate your results.
Let’s dive in. 🌤️
1. Why Natural Light Is So Powerful
Before we talk about technique, we need to understand why natural light works so well.
1.1 The Quality of Sunlight
Sunlight is:
- Full-spectrum (rich in color information)
- Dynamic and dimensional
- Naturally diffused by the atmosphere
- Emotionally familiar to the human brain
Artificial lights try to imitate sunlight. But nothing truly replicates the softness, richness, and realism of natural light.
1.2 Your Phone Camera Loves Natural Light
Smartphone cameras have:
- Small sensors
- Limited dynamic range
- Limited low-light performance
Natural light solves these limitations by:
- Providing strong illumination
- Reducing digital noise
- Improving color accuracy
- Creating depth and contrast
The result? Cleaner, sharper, more vibrant footage — without spending money.
2. Understanding Light: The Foundations 🔎
To master natural lighting, you must understand five core properties:
| Property | What It Means | Why It Matters |
|---|---|---|
| Intensity | How strong the light is | Affects exposure and clarity |
| Direction | Where the light comes from | Shapes the face and adds depth |
| Quality | Hard vs soft light | Controls shadows and texture |
| Color Temperature | Warm vs cool tone | Influences mood |
| Consistency | Stable vs changing light | Affects continuity |
Once you understand these, you stop guessing — and start controlling.
3. The Secret #1: Direction Is More Important Than Brightness
Most beginners think more light = better video.
That’s not true.
The direction of light is far more important than how bright it is.
3.1 Front Lighting ☀️
Light coming from in front of you:
- Reduces shadows
- Smooths skin
- Creates a clean look
- Ideal for tutorials and beauty content
Setup:
Stand facing a window. Keep the window directly in front of you. Avoid direct overhead sun.
3.2 Side Lighting 🌗
Light from the side creates:
- Depth
- Dimension
- Dramatic contrast
- Professional cinematic look
Setup:
Position yourself 45 degrees from a window. Let light hit one side of your face.
This creates natural shadow and highlights — making your video look intentional.
3.3 Backlighting 🌅
Light behind you can:
- Create silhouettes
- Produce glowing hair highlights
- Add drama
But it can also:
- Make your face too dark if not handled properly.
If using backlight:
- Move closer to the light source.
- Let your face catch reflected light from walls.
- Use sheer curtains to soften.
4. The Secret #2: Soften the Light for Beauty
Hard light creates harsh shadows. Soft light creates flattering results.
4.1 What Is Hard Light?
Hard light:
- Comes directly from the sun
- Creates sharp shadows
- Emphasizes texture and wrinkles
- Often appears at midday
4.2 What Is Soft Light?
Soft light:
- Comes through clouds or curtains
- Wraps around the face
- Reduces imperfections
- Feels cinematic and natural
4.3 How to Soften Natural Light
You don’t need expensive gear. Use:
- Sheer curtains
- White bedsheets
- Frosted glass
- Position near window but not directly in sun
Soft light = instant upgrade.
5. The Secret #3: The Time of Day Changes Everything ⏰
Light changes throughout the day.
Understanding this is transformative.
| Time of Day | Light Quality | Best Use |
|---|---|---|
| Early Morning | Soft, cool | Calm, fresh content |
| Late Morning | Bright, neutral | Clean tutorials |
| Midday | Harsh, direct | Avoid or diffuse |
| Late Afternoon | Warm, angled | Emotional storytelling |
| Golden Hour | Warm, soft, glowing | Cinematic scenes |
| Blue Hour | Cool, moody | Artistic shots |
5.1 Golden Hour 🌇
Golden hour is magic:
- Warm tones
- Long shadows
- Flattering skin
- Emotional atmosphere
Shoot outdoors or near a west-facing window just before sunset.
5.2 Avoiding Midday Mistakes
Midday sun:
- Creates strong eye shadows
- Causes squinting
- Produces harsh contrast
If you must shoot at midday:
- Move indoors
- Use curtains
- Shoot in shaded areas
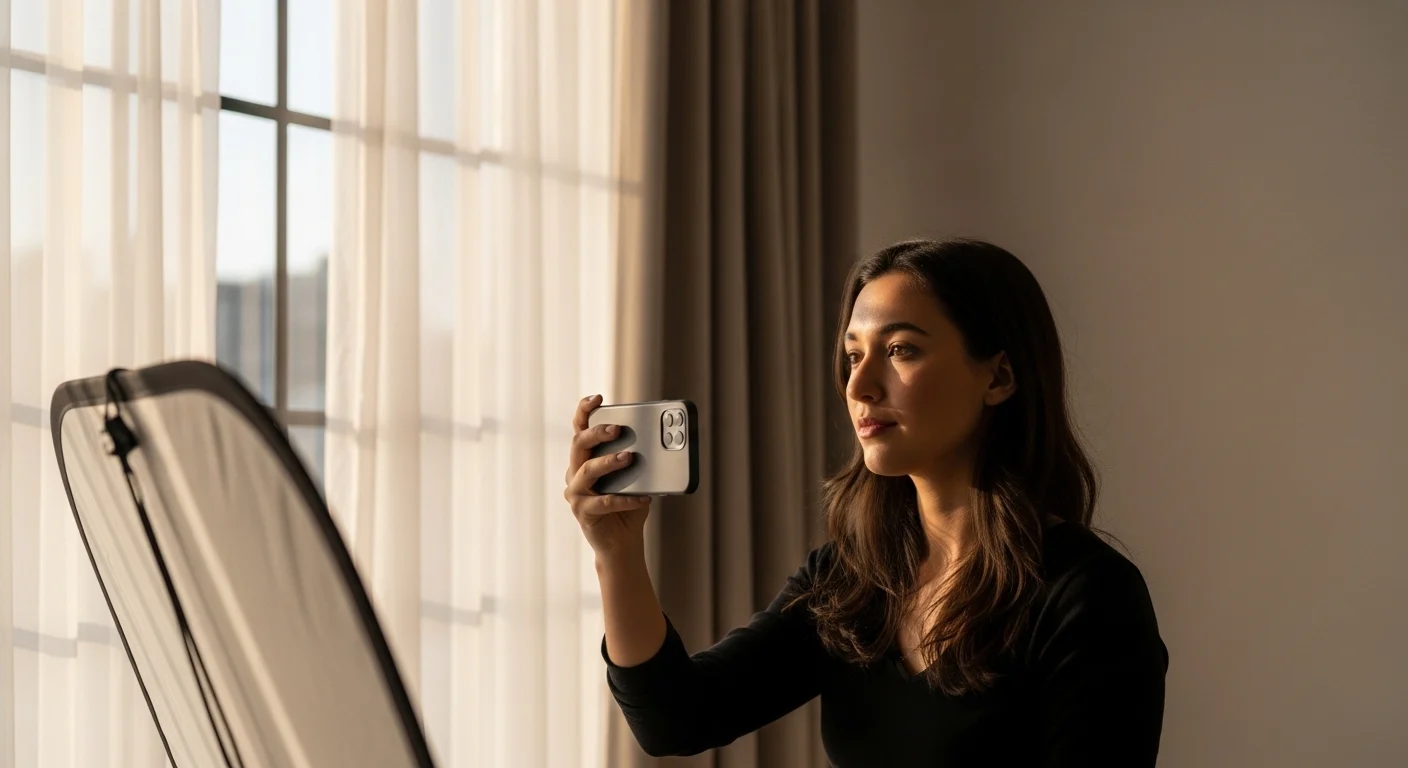
6. The Secret #4: Use Reflection Like a Pro
Professional cinematographers use reflectors.
You can too — without buying anything.
6.1 What Is a Reflector?
A reflector bounces light back onto the subject.
This reduces shadows and balances exposure.
6.2 DIY Reflector Options
You can use:
- White wall
- White poster board
- Foam board
- White T-shirt
- Paper
Place it opposite the window to bounce light back onto your face.
This fills shadows and creates a polished look.
7. The Secret #5: Background Matters More Than You Think 🖼️
Light doesn’t only hit you — it hits your environment.
If your background is:
- Too bright → your face darkens.
- Too dark → image feels heavy.
- Messy → distracts attention.
7.1 Window Behind You? Be Careful.
If the window is behind you:
- The camera exposes for the bright background.
- Your face becomes underexposed.
Instead:
- Turn around.
- Face the window.
- Or move sideways.
8. Positioning Guide for Phone Creators 📐
Here is a simple practical setup table:
| Scenario | Position | Result |
|---|---|---|
| Talking Head | Face window directly | Clean, bright |
| Interview | 45° to window | Professional depth |
| Product Demo | Window side light | Texture and detail |
| Lifestyle Shot | Window behind subject + side fill | Cinematic |
| Social Media Reel | Window + reflector | Balanced and engaging |
9. Vertical vs Horizontal Lighting Considerations
For vertical videos (TikTok, Reels):
- Keep light centered on face.
- Avoid strong side shadows.
- Maintain eye-level lighting.
For horizontal videos (YouTube, courses):
- Use side lighting for depth.
- Consider background separation.
- Use diagonal composition.
10. The Psychology of Natural Light 🧠
Natural light communicates emotion subconsciously.
Bright Light
- Transparency
- Energy
- Trust
- Optimism
Warm Light
- Comfort
- Intimacy
- Storytelling
- Romance
Soft Cool Light
- Calm
- Reflection
- Intelligence
- Focus
Understanding this allows you to control not only visuals — but emotional impact.
11. Common Natural Lighting Mistakes 🚫
11.1 Standing Under Overhead Light
Ceiling lights create:
- Eye shadows
- Nose shadows
- Unflattering look
Solution:
Turn them off. Use window light instead.
11.2 Mixing Light Temperatures
Window light (cool) + warm lamp = strange skin tones.
Your phone struggles with white balance in mixed lighting.
Solution:
Turn off artificial lights when using natural light.
11.3 Ignoring Weather
Cloudy days are amazing for filming.
Clouds act as giant softboxes in the sky ☁️
Don’t cancel your shoot because it’s cloudy — embrace it.
12. Advanced Technique: Creating Depth with Light Layers 🎥
Professional-looking videos often have three layers:
- Foreground (you)
- Midground
- Background
To create depth:
- Let light hit you strongly.
- Keep background slightly darker.
- Add separation by stepping away from wall.
Distance from background matters.
| Distance from Wall | Result |
|---|---|
| 0.5 meter | Flat look |
| 1 meter | Slight depth |
| 1.5–2 meters | Cinematic depth |
13. Controlling Exposure on Your Phone 📲
Most phones allow manual exposure adjustment.
Tips:
- Tap your face to focus.
- Slightly reduce exposure slider.
- Avoid overexposing skin.
Slight underexposure often looks more professional than overexposure.
14. Outdoor Natural Lighting Mastery 🌳
Shooting outside requires strategy.
14.1 Avoid Direct Sun on Face
Stand in:
- Open shade
- Under trees
- Next to buildings blocking direct sun
14.2 Use the Sky as Light Source
When in shade, the sky becomes your soft light.
Face toward open sky for best illumination.
15. The Window Formula (Simple Rule)
If you remember only one formula, remember this:
Face the window.
Soften the light.
Add reflection.
Step away from background.
This alone solves 80% of lighting problems.
16. Creating Cinematic Mood with Natural Light 🎬
You can simulate high-end cinema looks using:
- Side window light
- Darker room
- Controlled highlights
- Slight underexposure
Let one side of the face fall into shadow.
That’s how drama is created.
17. Natural Light for Different Content Types
17.1 Educational Content
- Front soft light
- Neutral color temperature
- Even exposure
17.2 Personal Branding
- Slight side lighting
- Warm tone
- Clean background
17.3 Storytelling
- Golden hour
- Angled light
- Emotional shadows
17.4 Fitness Content
- Strong directional light
- Side highlights
- Emphasize muscle definition
18. Minimal Equipment Setup Under $0 💸
You likely already own everything needed:
- A window
- A white wall
- A white sheet
- Your phone
- A stable surface
No ring light required.
19. The Real Secret: Observe Before You Record 👀
Before pressing record:
- Look at your face in the light.
- Turn slowly.
- Watch shadows change.
- Notice catchlights in eyes.
Catchlights (small light reflections in eyes) make you look alive and engaging.
No catchlight = dull appearance.
20. Master Checklist Before Recording ✅
Use this quick checklist:
- Is the window in front or 45°?
- Are artificial lights off?
- Is light softened?
- Is background balanced?
- Am I at least 1 meter from wall?
- Is exposure slightly reduced?
- Do I see catchlights in my eyes?
If yes — press record.
21. How Professionals Think About Light
Professionals don’t think:
“Is it bright enough?”
They think:
- Where is the light coming from?
- What emotion does it create?
- What shadows are forming?
- What story does this light tell?
Light is storytelling.
22. From Amateur to Professional: The Shift
Amateur mindset:
“I need better camera.”
Professional mindset:
“I need better light.”
Once you internalize this, your content changes forever.
23. Practice Exercises to Master Natural Lighting 🎓
Exercise 1:
Film the same clip:
- Facing window
- Side window
- Window behind
Compare results.
Exercise 2:
Film at:
- Morning
- Noon
- Late afternoon
Study color and shadow differences.
Exercise 3:
Add reflector.
Remove reflector.
Compare.
Learning happens through observation.
24. Final Thoughts 🌟
Natural lighting is not about equipment.
It’s about:
- Awareness
- Positioning
- Timing
- Subtle control
The secret is simple — yet powerful:
Light shapes perception.
With just a window and intention, your phone can produce cinematic results that rival expensive setups.
Stop chasing gear.
Start studying light.
And once you see light — truly see it — you’ll never look at a room the same way again.
Leave a Reply